Do you want to maximize your workflow and increase productivity? Look no further than ClickUp! ClickUp is a comprehensive project management software that can help you streamline your tasks, monitor progress, and increase collaboration.
In this blog post, we’ll provide step-by-step instructions on how to use ClickUp to get the most out of your workflow. Read on to learn more about how ClickUp can make your work easier and more efficient.
What is ClickUp?
ClickUp is an online project management tool that can be used to manage your workflow and help you get things done faster. It helps you stay organized, plan ahead, and keep track of tasks. With Click Up, you can easily create projects and assign tasks to team members, collaborate in real-time, and track progress. You can also use Click Up to prioritize tasks, add comments, upload attachments, and set deadlines. In short, it’s a powerful yet intuitive way to keep your workflow on track and get work done.
Getting Started with ClickUp, getting an account
Getting started with ClickUp is easy. You can create an account for free using your email address and creating a password. Once you’ve created an account, you will be taken to the main page where you can begin managing your projects and tasks.
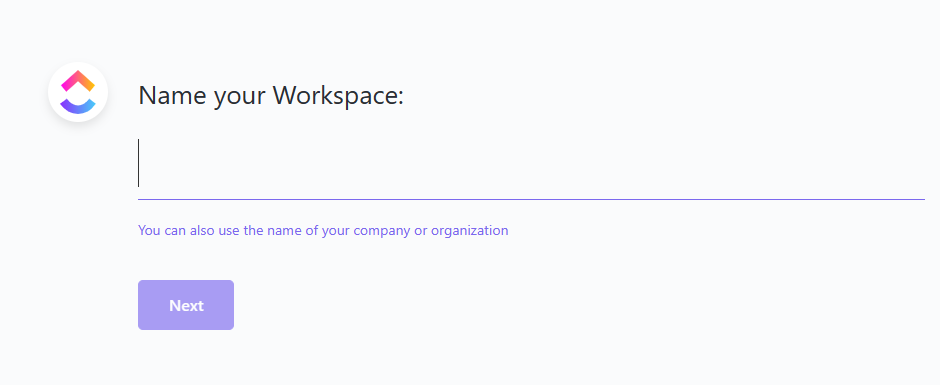
The first step to getting started with ClickUp is to create a workspace. A workspace is basically a project that you want to manage within Click Up. Each workspace is like its own area where you can assign tasks and manage your workflow.
Once you have a workspace, you can begin assigning tasks. ClickUp allows you to assign tasks to other members of your workspace, or to yourself. This is great for keeping track of who is responsible for what in your project.
You can also add lists to help organize your tasks. You can create lists for specific tasks, such as deadlines, progress reports, or anything else related to your project. The lists will be visible to everyone in the workspace, so everyone knows what needs to be done.
Additionally, you can add checklists to individual tasks. This makes it easier to keep track of what needs to be done and who is responsible for each item on the list.
Finally, you can add comments to any task or list in your workspace. This makes it easy for everyone to stay up-to-date with the progress of the project.
Getting started with ClickUp is easy and efficient, allowing you to manage your workflow quickly and efficiently. With these features, it’s easy to see why Click Up is becoming one of the most popular tools for project management.
Creating a Workspace

Once you have signed up for your account, the next step is to create a workspace. A workspace is like a virtual office, allowing you to organize and manage tasks within it.
To create a workspace, first, click on the ‘New Workspace’ button located at the top right of the page. From there, you can enter the name of your workspace and select which type of view you would prefer (such as a board or list). Then click on ‘Create’.
Once your workspace is created, you can add members to it by clicking on the ‘Add Members’ button at the top right corner of the page. This will allow you to share your workspace with other people so they can collaborate and work together on tasks.
Once you have added all of your members, you can start assigning tasks and managing your workflow. The workspace feature allows you to keep everything organized in one place so that all of your team members can easily access it. You can also assign tasks to specific members and track progress in real-time.
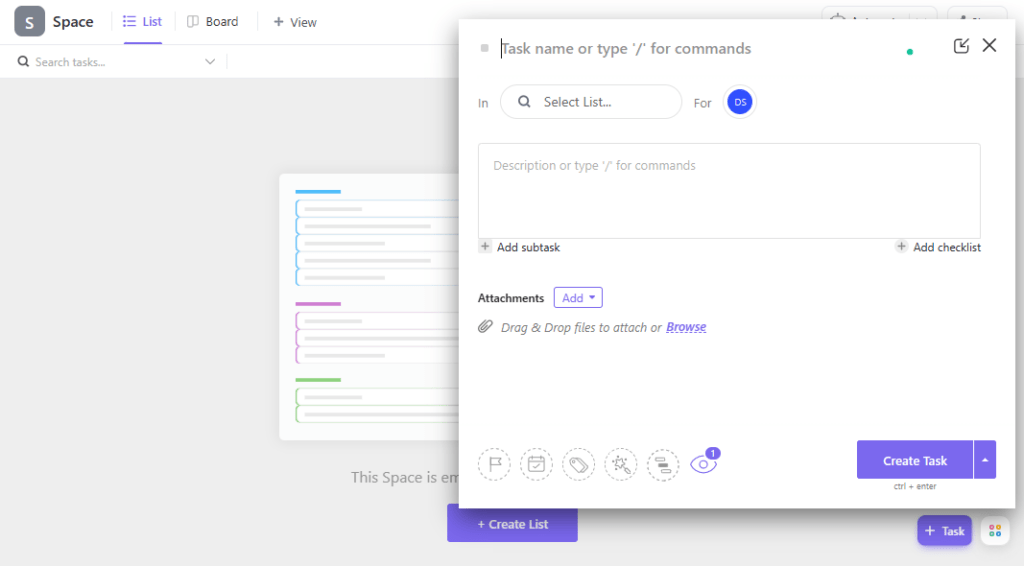
Adding Tasks

- Open the ClickUp app.
- Tap the “+” button at the bottom of your screen.
- Select “Task” from the drop-down menu, then enter a name for your task in the text box that appears.
- Select whether you want this task to repeat by tapping “Daily” or “Weekly” under Repeat Schedule (this will be greyed out if you don’t select Daily or Weekly).
- Tap Save at the top right corner of your screen!
Assigning Tasks

Assigning a task on Click Up is easy and can be done in just a few clicks. Here’s how:
- Go to the project to which you want to assign a task.
- Click on “Task” in the top navigation bar.
- Click on “Assign.”
- Select the person you want to assign your task to, or if you have multiple people selected, click on “Make Multiple Selections” and choose who else you’d like to assign this task to.
- Type in what needs done into the “Task Description” field and then click “Save.”
Adding Checklists
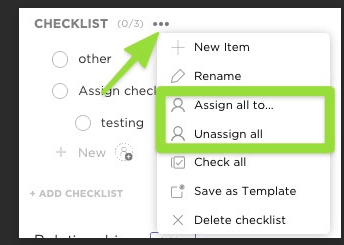
First, hover over the title of your checklist and click the ellipses… symbol. Then select the “Assign all to” option to pass the checklist to a ClickUp person.
Adding Comments
Commenting on ClickUp has never been easier.
When you hover over a comment, you’ll see a little icon with three dots in it. Click that, and you’ll find yourself in the Comment sidebar. From there, you can resolve the comment, react to it, or reply to it directly from your desktop. Watch the full tutorial on using Click Up as a CRM.

Are you enjoying your time on JBKlutse?
Articles like these are sponsored free for everyone through the support of generous readers just like you. Thanks to their partnership in our mission, we reach more than 50,000 unique users monthly!
Please help us continue to bring the tech narrative to people everywhere through relevant and simple tech news, reviews, buying guides, and more.
Support JBKkutse with a gift today!